Information & News
Adding Cloud Storage to File Explorer
Easily add your cloud drives to your file explorer for ImageRamp batch processing.
Using Cloud services for your batch processing needs, is easy with many of the available options for storing you business documents. With online storage services, you now have access to unlimited storage and automated backup services. Here we will look at some of the more popular cloud storage options available, including Dropbox, Google Drive, and OneDrive, and configure each with our file explorer system. Each one offers different benefits and varying levels of security, so be sure to choose the right option based on your specific needs.
It's easy to add cloud storage to the Microsoft File Explorer application, on your Windows desktop computer running Windows 10 or 11. Here are the simple steps to follow:
1. Adding Microsoft OneDrive to File Explorer
OneDrive is a popular cloud-storage services that is included with the Windows operating system. As expected, it is well integrated with the operating system coming from the same software manufacturer.
If you want to pin your OneDrive storage to File Explorer, follow these steps:
To launch OneDrive, begin by entering "OneDrive" into the Start search box. Once it appears in the results, select it to open.
If you already have a OneDrive account, simply complete the credentials with your email address and password. If you do not have an account set up, follow the instructions to set one up.
Select your OneDrive folder by following the on-screen instructions. If you've logged in to OneDrive on your computer before, there's a chance that you have an existing OneDrive folder; if so, simply click "Use this folder" and continue.
Upon completion of these steps, your OneDrive files will instantly appear in File Explorer. With this newfound capability, you can quickly and simply move documents into or out of OneDrive with ease!
2. Adding Google Drive to File Explorer
Google Drive is another popular cloud storage option for Windows users. Google Drive is ideal for small businesses and is free for the first 15GB, after which a nominal fee of $2,3 or $10/month gets you up to 2GB. Larger storage plans are also available.
To integrate Google Drive into your Windows File Explorer, follow these steps:
To get started, download Google Drive for Desktop and sign in with your Google account. Make sure you're using the account that has your Google Drive files on it.
After completing the installation and signing in, Google Drive will be visible as the “G:” drive in File Explorer of Windows.
Your G: drive will operate similarly to a traditional hard disk on your device. Whenever you make any changes or additions, they'll instantly be synced with Google Drive. However, by default, deletions made from your PC are not removed from the cloud unless you select this option.
3. Adding Dropbox to File Explorer
For both personal and professional use, Dropbox is a widely-used cloud storage platform. It offers flexible pricing plans, high levels of security, and the ability to collaborate with others on shared files.
To get Dropbox set up in File Explorer, simply follow these steps:
Head over to the Dropbox website to begin the process. From there, simply click the "Download the app" button and you'll be on your way to secure cloud storage.
To get started, open the downloaded installer file and input your account email address as well as password. After that click “Sign in” to move forward.
After successfully signing in, click on the "Open my Dropbox" button, and then click "Get Started."
Click "Next" and then click "Finish." You should see the Dropbox drive show up in File Explorer. With your Dropbox account set up in File Explorer, you can now easily access and share your files on the go.
Now, you have easy access to all of your cloud-stored files on Dropbox. This means that you can collaborate with others in real time and share your files with ease. Whether it's for personal or professional use, Dropbox offers a reliable, secure platform to store your files in the cloud.
Check out articles, videos, forums and tips for information on batch processing, ImageRamp Batch and ChronoScan. Learn about watching folders for unattended document capture, image enhancement and cleanup options, improving OCR capture on your documents, and more.
Articles and Tips on using Barcodes in automating Document Processing
Learn how barcodes can be used to help splitting, file naming and folder creation of your documents.
This page of links directs you to videos, presentations and articles intended to help you improve your document workflows using barcodes.
| Article | Description |
| What Can Barcodes Do for Me? (SlideShare) | A look at the use of barcodes in today's intelligent data capture for document management and Electronic Medical Records (EMR) environments. Visit the SlideShare. |
| Split and Rename Files to Barcodes | See ImageRamp features to split, name and route based on barcode information. Learn how multiple barcodes are used and evaluated in ImageRamp |
| 20 Tips to Solve Common Problems Reading Barcodes | Describes common issues with barcode images and suggests some possible solutions to optimize barcode recognition with ImageRamp barcode settings, cleanup operations and smart preprocessing decisions. |
| FAQ- Ignoring Barcodes for Split and Naming | Look at how ImageRamp can ignore barcodes based on minimal barcode length and text strings. |
| Using Barcodes to automate Student Approval Forms | Explore how barcodes and a standard pdf form can be used to create uniquely stamped documents to send to your clients. Each is tagged uniquely with a QR Code to associate the signed document with individuals like student approval forms. |
| How Can I Create Barcode Separation Sheets (Slip Sheet Insertion) | Learn about the free barcode separation sheet software for use with ImageRamp Batch. And check out What is Slip Sheet Insertion? |
| Barcodes Help Automate Indexing Through XML Files | Barcodes offer an accurate method of capturing index or meta data to pass through XML to populate document management or EMR/EHR systems. |
| Create PDF Bookmarks with Barcodes | Understand how ImageRamp Batch an create files with PDF bookmarks using barcodes |
| Barcode Tagging - a First Step in Automating Accurate Patient Record and Lab Report capture | Whether your existing documents contain barcodes or they are added by barcode separation sheets, or slip sheets, capturing the barcode information or tag is the first step to manipulating and organizing your documents in a document management system. |
| Data Mining Automates Document Capture | Learn how meta data (index information) can be pulled from documents with ImageRamp Batch and its barcode features and regex. |
| How to Automate File and Folder Names with Keywords | Automate the naming and destination path of documents with barcodes and text strings. |
| Barcode Splitting and File Naming VIDEO | This video shows how files can be split, renamed and routed by utilizing barcode coversheets. |
| Automating File Naming with Barcodes VIDEO | This video shows how to speed up indexing processes by automating file naming using barcodes |
| PDF Encryption and Barcode Splitting on Fujitsu ScanSnap - VIDEO | See how PDF encryption and barcode splitting can be accomplished with ImageRamp's powerful capture features. |
| As scanning with barcodes often involves batch processing, please see our Support section of information on Batch Processing. | |
This support section contains general information on document capture and scanning. Read articles and view slideshows such as "What is Intelligent Document Capture?", "What is Document Indexing?", and "Understanding Your Scanning Requirements".
Videos and More
-
Folder Watching/Batch Scanning
Understand folder watching as part of a batch scanning environment. Use ImageRamp with or without Windows Services to automatically split, name, route, and index your scans and files.
-
What is Batch Document Processing?
Learn about batch document processing and the technologies used such as barcode recognition, content mining, OCR and more for unattended, automated processing.
-
How to Improve OCR Accuracy
See ways to improve OCR accuracy on document scans. Cleaning and enhancing images can greatly improve the accuracy of OCR interpretations on your documents.
-
What is Document Indexing?
Learn what document indexing is and how index data can be captured with barcode recognition, OCR and more for unattended or automated indexing.
-
Tips to Solve Barcode Problems
Enhance barcode images and improve your barcode capture with clean, readable barcodes.
-
Automated Document Indexing with ImageRamp
Learn how document indexing can be easily automated, capturing valuable metadata with little to no user intervention.
-
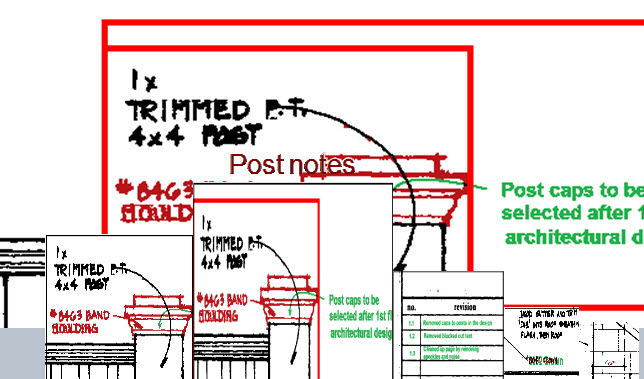
How to compare PDF drawings
ImageRamp Compara provides a simple solution to compare scanned image files. Using overlay and side by side comparison techniques, use ImageRamp Compara to identify differences within your documents. Compare PDF and scanned Drawings
Learn from our slide share presentations.
See how to compare multipage drawing sets, identify or tag the differences, and publish them for easy communications with your teams and suppliers
-

See More Slide Tutorials
Check out our other tutorials with topics such as What is Intelligent Data Capture?, regular expressions and data mining, and more.
-
How to Batch Zone OCR File Naming
Learn how to use Zone OCR processing to automate file naming of your scanned files.

Watching different folders to automate file naming
Use Zone OCR and document classified folders to automate file naming.
-
How to use Barcodes to create Bookmarks in PDF files
Learn how to use barcodes to automatically bookmark your PDF files into a categorized document.
How to use Barcodes to Create Bookmarks in PDF Files
Use ImageRamp to automate the creation of bookmarks in your PDF files. It's an easy way to add PDF standardized navigation to sections, chapters, years, etc. within a PDF document.
-
How to use OCR Zones to automate file naming and folder creation
Learn how Zones and dual OCR processing can be used in automating File Naming and Folder Creation.
OCR Zones and Dual OCR engines can be used to automate the naming and folder storage of your scanned invoices, slip sheets, medical records and much more. Using batch folder watching tools, ImageRamp can monitor folders for newly scanned documents, perform dual OCR recognition and take the highest ranking scores to use for the highest accuracy possible. Once captured, the naming and storage is automated.
How to zone ocr text for automated file naming and folder creation
This short video shows users how to automate the naming and splitting of scanned, pdf or word documents using zonal OCR and regular expressions. Use it to determine file splits, create the output file name, and automate storage into directories created from the extracted text. Play Video.
-
How to use Zone OCR to help Automate Shipping and Invoice Document automation
Learn how to use OCR recognition and Zones to extract key information from scanned shipping documents. Once the data is captured, it can be used in the file naming and folder creation processes more efficiently.
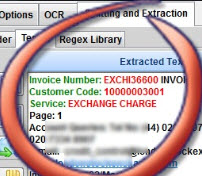
Automating the file naming of shipping documents.
Zone or Regional OCR mining is helpful in capturing specific data from Shipping, Invoice, and other Document Types. By scanning these images into PDF form and then performing specific region OCR, you can use the data to automate the naming of files and auto create folders for their storage. See how this works in this short video.
This short video shows users how to automate the naming and splitting of scanned shipping documents using zonal OCR and regular expressions. Use it to determine file splits, create the output file name, and automate storage into directories created from the extracted text. Play Video.
-
How to Inspect and Remove Privacy Data
Learn how to remove Privacy data from your documents using OCR and search pattern techniques.
With ImageRamp Batch and Composer, you can remove sensitive data including barcodes and scanned text data with ease.
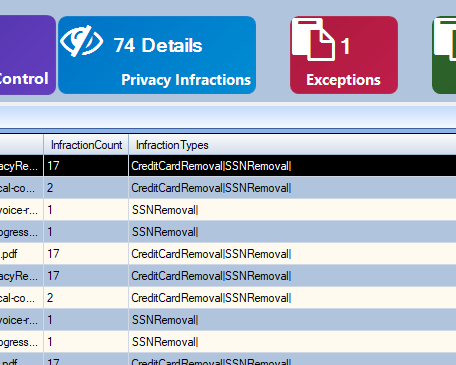
Inspect and Remove Privacy Data from your Documents
This short video shows users how to inspect and then redact privacy infractions. Use regular expressions to set up patterns that become flagged and can be blacked our white out overlayed to permanently remove sensitive content from your scanned, word or PDF text based documents. Play Video.